1 Introduction
A drawing of an archaeological object should provide the viewer, who
of course had never seen the object, with a "substitute",
which can never be as good as the original but it can contain the relevant
details. A drawing, in comparison with a photograph, is characterised
by a considerable amount of subjectivity, which is not necessarily a
disadvantage.
If a drawing is going to contain an optimal amount of (optical) information
about the object, and if the viewer is going to be able to visualise
the object, then certain drawing standards should be adhered to. It
is not usual to draw up a set of guidelines for preparing archaeological
drawings. Normally, they are a function of experience, rough standards,
and what the drawer actually sees or how he interprets what he sees.
The author, who is co-author of KnasterKOPF, feels that
rules or guidelines on how drawings of small objects like clay pipes,
which are full of detail, should be carried out are essential. They
are particularly necessary to meet the need for accurate information
mentioned above and to satisfy the requirements of the publication.
These guidelines should prove to be a valuable help those scientists,
local researchers and collectors who are confronted by the problem of
making drawings of clay pipes for the first time. Editorial requirements
stipulating how the drawings should be done for publication in KnasterKOPF
are also included for those preparing a manuscript.
 2 Description of clay pipes
Descriptions of clay pipes and the details on them should make use of
the terminology worked out in 1987 by Martin Kügler (Kügler
1987, pp. 50-54; Kügler & Schmaedecke 1999) and already much
used in KnasterKOPF and widely adhered to in scientific papers on clay
pipes.
3 Making the drawings
3.1 Correct illumination and viewing of clay pipes
Even the best scientific draughtsman can only incorporate as much detail
as he or she can see on the object. Since clay pipes exhibit small and
often poorly moulded decoration and inscriptions, which are difficult
to read on account of their often being printed around the stem, it
is absolutely essential to use the optimal type, direction and amount
of illumination. The recommended illumination is a strong light shining
obliquely from top left (this is the illumination conventionally used
in drawing archaeological material; see Section 3.5.).
It is sometimes necessary to rotate the object under oblique light in
order to make complicated designs and patterns visible. This often allows
the smallest differences in relief to be seen. In addition,
one can use a x3 or x5 lens. A x20 lens certainly helps to detect fine
surface details, but it is not altogether suitable, on account of its
high magnification, to use while drawing.
3.2 Content and arrangement of a drawing
A clay pipe or part of one including all or part of the bowl is best
viewed from the side (Figs. 1 & 2)
|
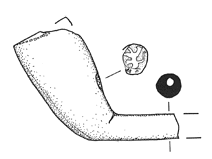 |
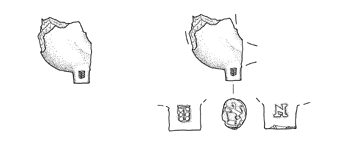
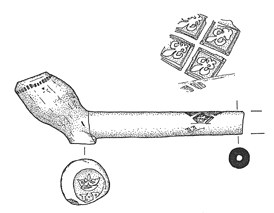
Fig. 1. Incomplete clay pipe: faint traces of burnishing on bowl;
the stem design has been enlarged in the drawing and is skew,
as on the actual stem.
|
Fig. 2: Incomplete clay-pipe bowl with part of stem; separate drawing
of mark on back of bowl; auxiliary line suggesting missing part
of bowl.
|
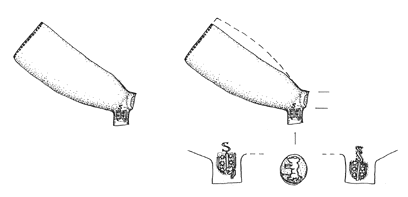
The pipe is drawn with the bowl on the left and the mouthpiece on
the right. The stem is drawn in a horizontal position, unless the angle
between bowl and stem is less than 90º; in this case the central
axis of the bowl is placed up-and-down the page for drawing, i.e. upright
(Fig. 3).
Certain details on a pipe that are not visible on the main drawing,
or are too small, should appear as an enlarged drawing near where they
actually occur on the pipe, e.g. the heel mark near the heel and a rolled-out
drawing of the inscription on the stem should be above the stem (Figs.
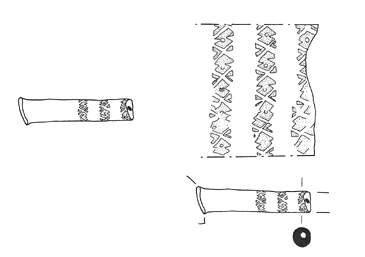
1, 2, 5b, 6b, 7b). If a stem fragment that has no
remnants of a bowl on it possesses an inscription that runs round the
stem, then it is best drawn vertically. In this way the rolled-out inscription
is more easily drawn and more easily read (Fig. 4).
The figure should reproduce the actual orientations of details on the
pipe; if, for example, a heel mark was originally stamped somewhat oblique
or crooked, then it should be drawn like that (Fig. 1).
When several drawings are arranged in a figure or on a page, then the
positions mentioned above may be modified in a few cases in order to
make optimal use of the available space.
It is worthwhile figuring a cross-section of the stem, since the thickness
of the stem and the diameter and position of the hole can be recorded
in this way. The cross-section does not need to be black as in the examples
figured, but it should contain no shading, since it is a theoretical
view, not a real one.
|
|
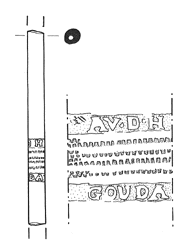 |
Fig. 3: Clay-pipe bowl with part of stem; bowl is drawn vertically
on account of the small angle between bowl and stem.
|
Fig. 4: Stem fragment: decoration runs around stem; note that the
design is not "cut" at the overlap but adjacent to it
(left side).
|
3.3 Scale
The clay pipe itself is drawn natural size (1:1). Details, such as marks,
and decorations or inscriptions on the bowl and/or stem, should be the
subject of extra drawing(s) at a scale of 2:1.
3.4 Line width and line type
A preliminary sketch can be made in pencil on white paper, and the outline
transferred to tracing paper. The final drawing should be done with
a Rapidograph pen in black ink on tracing paper. A line width of 0.25
mm has proved to be best for the outline of the object, 0.18 mm for
all normal details and 0.1 mm for the finest details, e.g. fine decorations,
marks or scratches etc. made during production.
When an inscription or decoration on the pipe stem or bowl is "opened
out" to make it more legible, then the auxiliary
line along which it is "cut" to open it out should be a dash-dot
line 0.25 mm wide. This type of line is normally used in archaeological
drawings to denote a theoretical line or boundary, not a natural one
(Figs. 4, 7b & 8c).
3.5 Shading
Shading is an important technique in drawing to portray a 3-dimensional
object on paper, which of course is a 2-dimensional surface. Today,
shading is done with dots and no longer with hachures or hatching. The
object is shaded as if illuminated from the top left (actually or theoretically);
hence shadows are towards the bottom right. The deeper parts of the
object or depressions can be most clearly represented by shading them,
even if they are quite well lit by the illumination used. Since clay
pipes are relatively small objects, shading should be used sparingly
so that it does not mask any decorations or production marks.
3.6 Rubbings as a help in drawing
The relief character of most of the decorations on clay pipes permits
us to take rubbings of them rather than trying to draw them to scale
freehand. A rubbing is made by fixing a piece of thin paper over the
decoration or inscription, often around the stem, and rubbing gently
over it with a hard pencil. One obtains a simple "negative"
of the decoration on the pape (Fig. 8a). Care should
be taken while fixing the thin paper to ensure that the line where the
rubbing is "cut" to open it out does not coincide with the
overlap produced when the design was rolled onto the soft, unfired clay-pipe
stem (Fig. 4 left).
It is important to be able to see the overlap (if any) clearly, as it
provides useful information about the rolling-on technique and the die
used.
It is essential to realise that the rubbing is only a preliminary step,
which possesses its own special errors. These must be corrected during
the next stage, i.e. when making the drawing. In order to obtain an
enlargement of 2:1 so that the fine details are clearer, the original
drawing can be photocopied at twice the size (Fig. 8b).
The outlines can then be traced in pencil from the photocopy onto a
sheet of tracing paper. Constant care should be taken to compare the
drawing with the original object to ensure that rubbing has captured
all the details. If the pipe shows considerable differences in relief,
e.g. seams between the moulds or high relief decoration, then sometimes
any adjacent fine detail is not picked up by the rubbing and has to
be subsequently added to the drawing by eye. In addition, the rubbing
process is "blind" and tends to stress less important details
like mould seams or scratches made during excavation to the same degree
as the design itself. In such cases it is up to the discretion and judgement
of the draughtsman to omit or suppress less relevant details and/or
to stress more important ones.
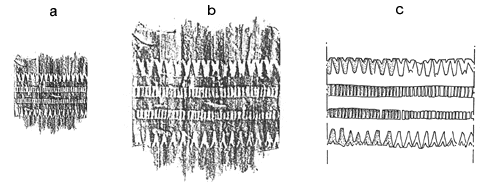
Fig. 8: Sequence of stages from the rubbing of a design around a pipe
stem to the finished drawing.
a) a rubbing "cut open",
(b) x2 enlargement of the rubbing, and
c) drawing of the enlarged rubbing
- the left-hand part is shaded to demonstrate the advantages of shading,
and the right-hand part left unshaded.
3.7 Subjectivity: Should I add or omit anything?
Clay pipes are quite fragile objects, meaning that we normally have
to deal with incomplete specimens. It is therefore important that a
few auxiliary lines should be added to the drawing to give the reader
an idea of the complete pipe may have looked like (or how the fragment
is related to the original pipe). This is relatively simple in the case
of a stem fragment; normally there are only two possible directions
in which it extended. However, in the more complicated case of part
of a pipe bowl, it is more difficult for the reader to visualise how
the part was related to the original pipe as a whole.
Figs. 5-7: Several bowl and stem fragments
(a) without auxiliary lines, and
(b) with auxiliary lines suggesting the shape of the original pipe.
4 Editorial requirements for publication in KnasterKOPF
Apart from the above guidelines, there are still a few special editorial
requirements. It is advantageous if the originals of all drawings are
kept by the author and clear copies are sent to the editor of KnasterKOPF,
who finds copies more convenient during planning of the layout. The
editor would be most grateful if pure white paper is used for the copies,
not recycled paper, however beneficial it may be for the environment!
Drawings may also be sent by electronic mail; however, before sending
them, this should be discussed with the editor.
Should you have a relatively large number of figures and wish to set
out the plates yourself, then this can be done, bearing in mind that
the print-face of KnasterKOPF is 23 x 17 cm. The plate
edge should be at least 1 cm from the edge of the print face. Figure
numbers should not be put on the original plate, but should be written
in pencil on a copy or sketch of the original and enclosed with the
original. Long specimens of pipes are doubtless a source of joy for
the archaeologist, but when drawn tend to be larger than the page. Thus,
drawings of very long pipes are often best reduced - however, this should
be discussed with the editor first.
5 Concluding remarks
Drawings are an essential element in any publication dealing with archaeology,
which is a science that depends heavily on the study of objects. Drawings
possess certain advantages over photographs, by which they are unlikely
to be superseded in the foreseeable future. However, poor drawings can
considerably reduce the quality of a good scientific paper. In order
to ensure that the quality of the papers in KnasterKOPF is maintained,
the editors reserve the right to refuse any drawing that does not meet
the required standard. The editors nevertheless will gladly advise or
recommend drafting services but regret that they cannot undertake any
drafting services themselves.
Anyone who contemplates publishing in KnasterKOPF and who cannot draw
sufficiently well or find anyone to do it for them, can always photograph
the material. Naturally, in this case certain standards must be maintained
too. We are currently preparing guidelines on photographing clay pipes
- these guidelines can be supplied on request.
Bibliography
Clay-pipe terminology
Kügler, Martin: Tonpfeifen. Ein Beitrag zur Geschichte der Tonpfeifenbäckerei
in Deutschland. Quellen und Funde aus dem Kannenbäckerland. Höhr-Grenzhausen
1987.
Kügler, Martin & Schmaedecke, Michael: Hinweise für die
Erfassung von archäologischen Tonpfeifenfunden. In: Tonpfeifen
in der Schweiz. Ed. by Michael Schmaedecke. (Archäologie und Museum,
vol. 40). Liestal 1999, pp. 124-132.
Examples for drawings
Kluttig-Altmann, Ralf: Tonpfeifen in Leipzig - Erster Vorbericht über
die Neufunde seit 1990. In: Knasterkopf - Mitteilungen für Freunde
irdene Pfeifen. No. 12, 1999, pp. 74-82.
Kluttig-Altmann, Ralf: Tonpfeifen in Leipzig - Zweiter Vorbericht über
die Neufunde seit 1990. In: Knasterkopf - Mitteilungen für Freunde
irdene Pfeifen. No. 13, 2000, pp. 10-28.
Kluttig-Altmann, Ralf: Beobachtungen zur Technologie manueller Stielverzierungen
an Tonpfeifen. Mit einem Beitrag von M. Kügler. In: Knasterkopf
- Mitteilungen für Freunde irdene Pfeifen. No.
14, 2001, pp. 32-49.
Drawings
by the author, except Figs. 6a & b by Frau H. Gross, Landesamt
für Archäologie Dresden.
|